MirAI User Manual
VERSION 2.0.8Quick Start
1. Overview
MirAI is an intelligent video surveillance and AI analytics platform. It consists of a high-performance Rust-based server (AI inference, stream management, data storage) and a Qt C++ desktop client (live monitoring, incident management, configuration).
Key Features
- Real-Time Video Streaming — Low-latency RTSP via GStreamer with hardware-accelerated decoding. Supports up to 100 cameras per server.
- AI Event Detection — Pipeline-based detection for Flame (fire), Smoke, Falldown, and Intrusion with configurable ROI/RONI zones and confidence thresholds.
- Multi-Camera Grid — Flexible grid (1×1 through 10×10, up to 100 feeds) that automatically expands or shrinks based on the number of cameras placed. Supports drag-and-drop reordering and camera groups.
- Camera Groups & AI Pipelines — Organize cameras into groups. Assign AI pipelines per group.
- Incident Recording & Audit — Automatic recording with a pre-event buffer. Audit workflow (True/False), multi-format download (MP4, AVI, PNG, JPG).
- Notification System — IF-THEN rule engine with Email, Webhook, HTTP Endpoint, or SNMP delivery. Global rate limiting and quiet hours.
- Multi-Server Support — Connect to multiple servers simultaneously, each in its own tab.
- Role-Based Access — Super_Admin, Admin, and User roles with granular permissions.
- System Management — Storage policies, scheduled backup/restore, audit trail, log viewer, automatic updates.
- Localization — English, Korean, and Japanese. Configurable timezone and date format.
Main Screen Layout
| Area | Purpose |
|---|---|
| Top Navigation | Switch between Live View, Incident Log, Settings. Mute toggle, user info, window controls. |
| Server List (left) | Tree view of servers → groups → cameras. Drag items to grid. |
| Live View Grid (center) | Camera streams in resizable grid. Supports drag-drop reordering. |
| Notification Panel (right) | Real-time AI alerts with thumbnails. Click to view incident detail. |
System Requirements
| Component | Minimum | Recommended |
|---|---|---|
| OS | Windows 10 (64-bit) | Windows 11 (64-bit) |
| CPU | Intel i5 / Ryzen 5 | Intel i7 / Ryzen 7+ |
| RAM | 8 GB | 16 GB+ |
| GPU (Server) | NVIDIA GTX 1060 | NVIDIA RTX 3060+ (AI inference) |
| Network | 100 Mbps LAN | 1 Gbps LAN |
| Disk | 500 MB (app) + 20 GB | 50+ GB SSD |
User Roles
| Role | Access Level |
|---|---|
| Super_Admin | Full access. Can create, modify, enable/disable, and delete AI pipelines. |
| Admin | Full access to everything EXCEPT pipeline modification (create/edit/delete/enable/disable). Can view pipelines. Can manage cameras, AI models, users, system settings, updates, notifications, and all other features. |
| User | Live streams and incident logs (read-only). Access to General Settings and Help only. |
Note: The only privilege difference between Super_Admin and Admin is the ability to add and modify AI pipelines. All other features (model management, updates, user registration, backup/restore) are accessible to both roles equally.
2. Getting Started
Login
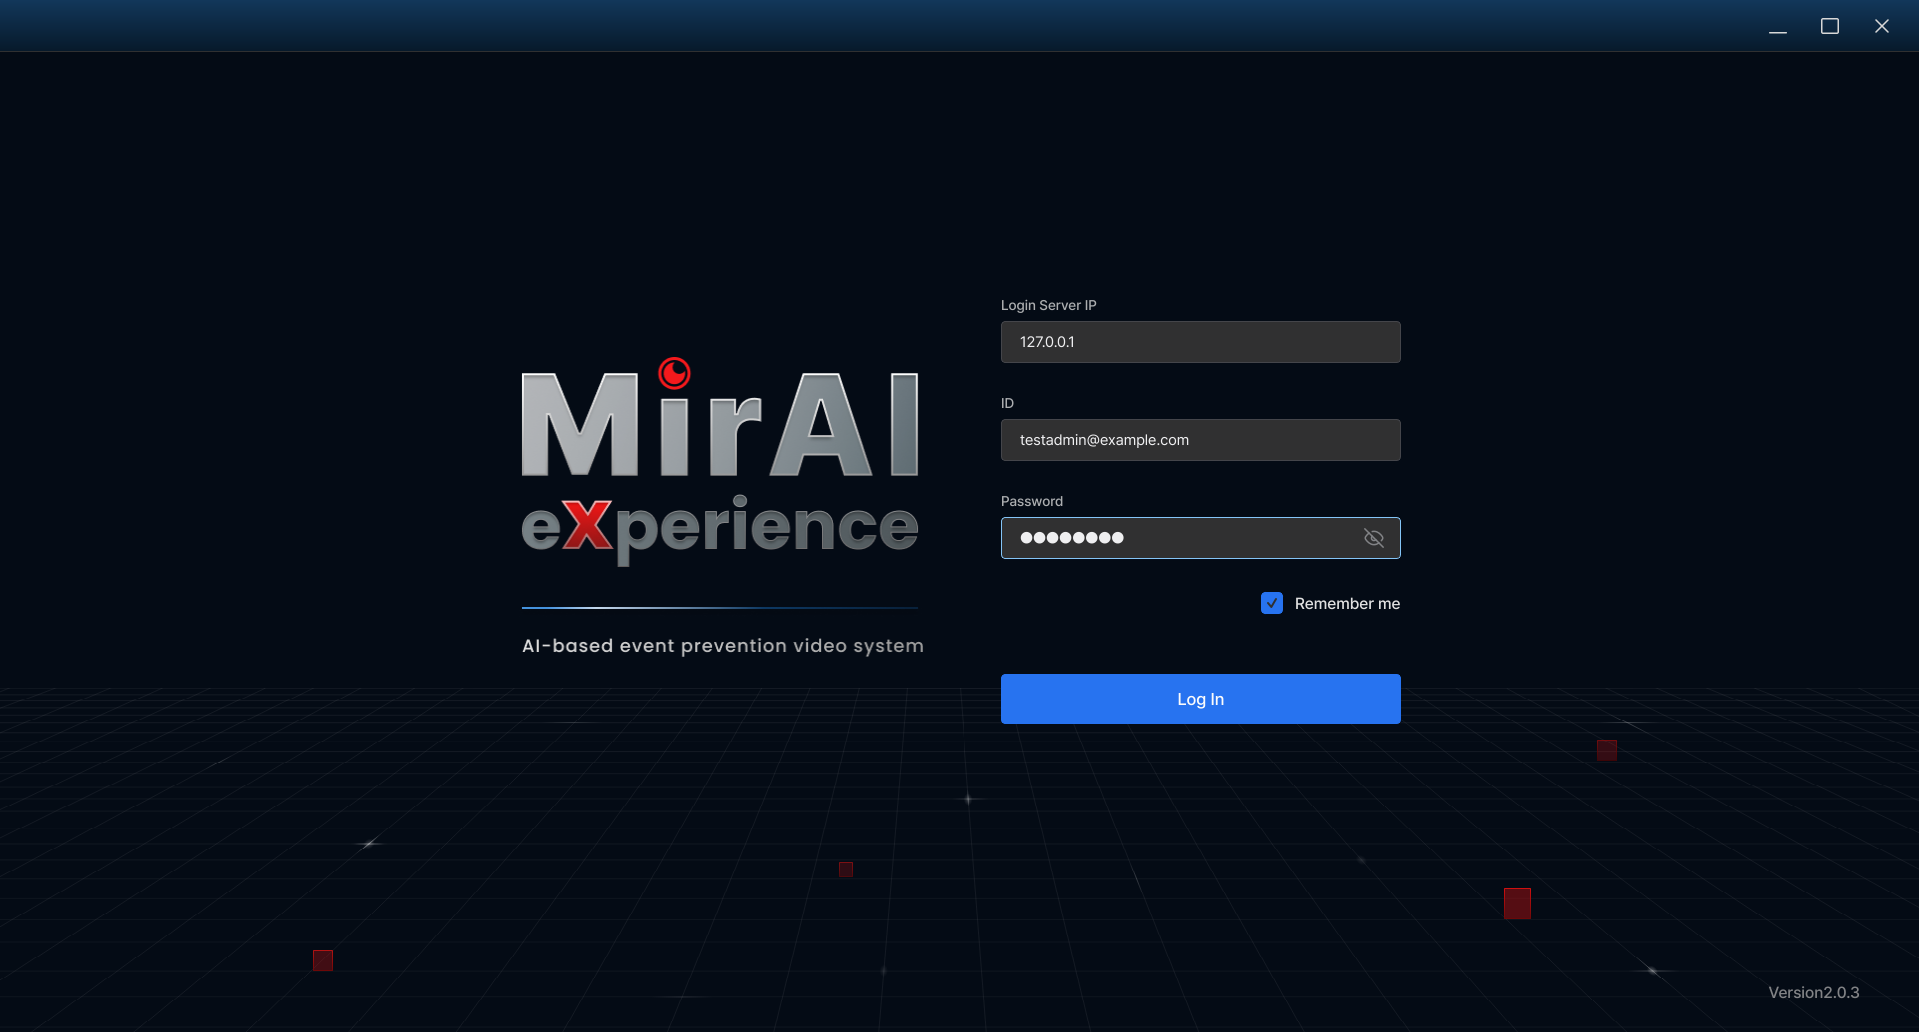
- Launch MirAI — Double-click the desktop icon.
- Enter Server IP — Type the server's IP address (e.g.,
192.168.1.100). Default port:7878(HTTPS). - Enter ID and Password — Use credentials from your system administrator.
- Check "Remember me" (optional) — Enables automatic login next time.
- Click "Log In" — If the server is starting up, a "Waiting for server..." dialog appears.
Tip: Press Enter to submit the login form without clicking the button.
First-Time Setup
Note: AI engine initialization, model registration, and pipeline creation are performed by the Super_Admin. As an Admin, start from the steps below.
After your first login, complete these steps in order:
- Change the default password → Settings → Users → Edit admin account
- Activate license → Settings → License → enter key or upload file
- Add cameras → Settings → Server and Camera → + Add Camera
- Create camera groups → Camera Groups tab → + Create Group
- Assign AI pipeline to group → Group Details → Configure AI Pipeline
- Enable detection per camera → Live View → Select camera → AI Settings → enable types
Adding Cameras
Automatic Discovery (ONVIF)
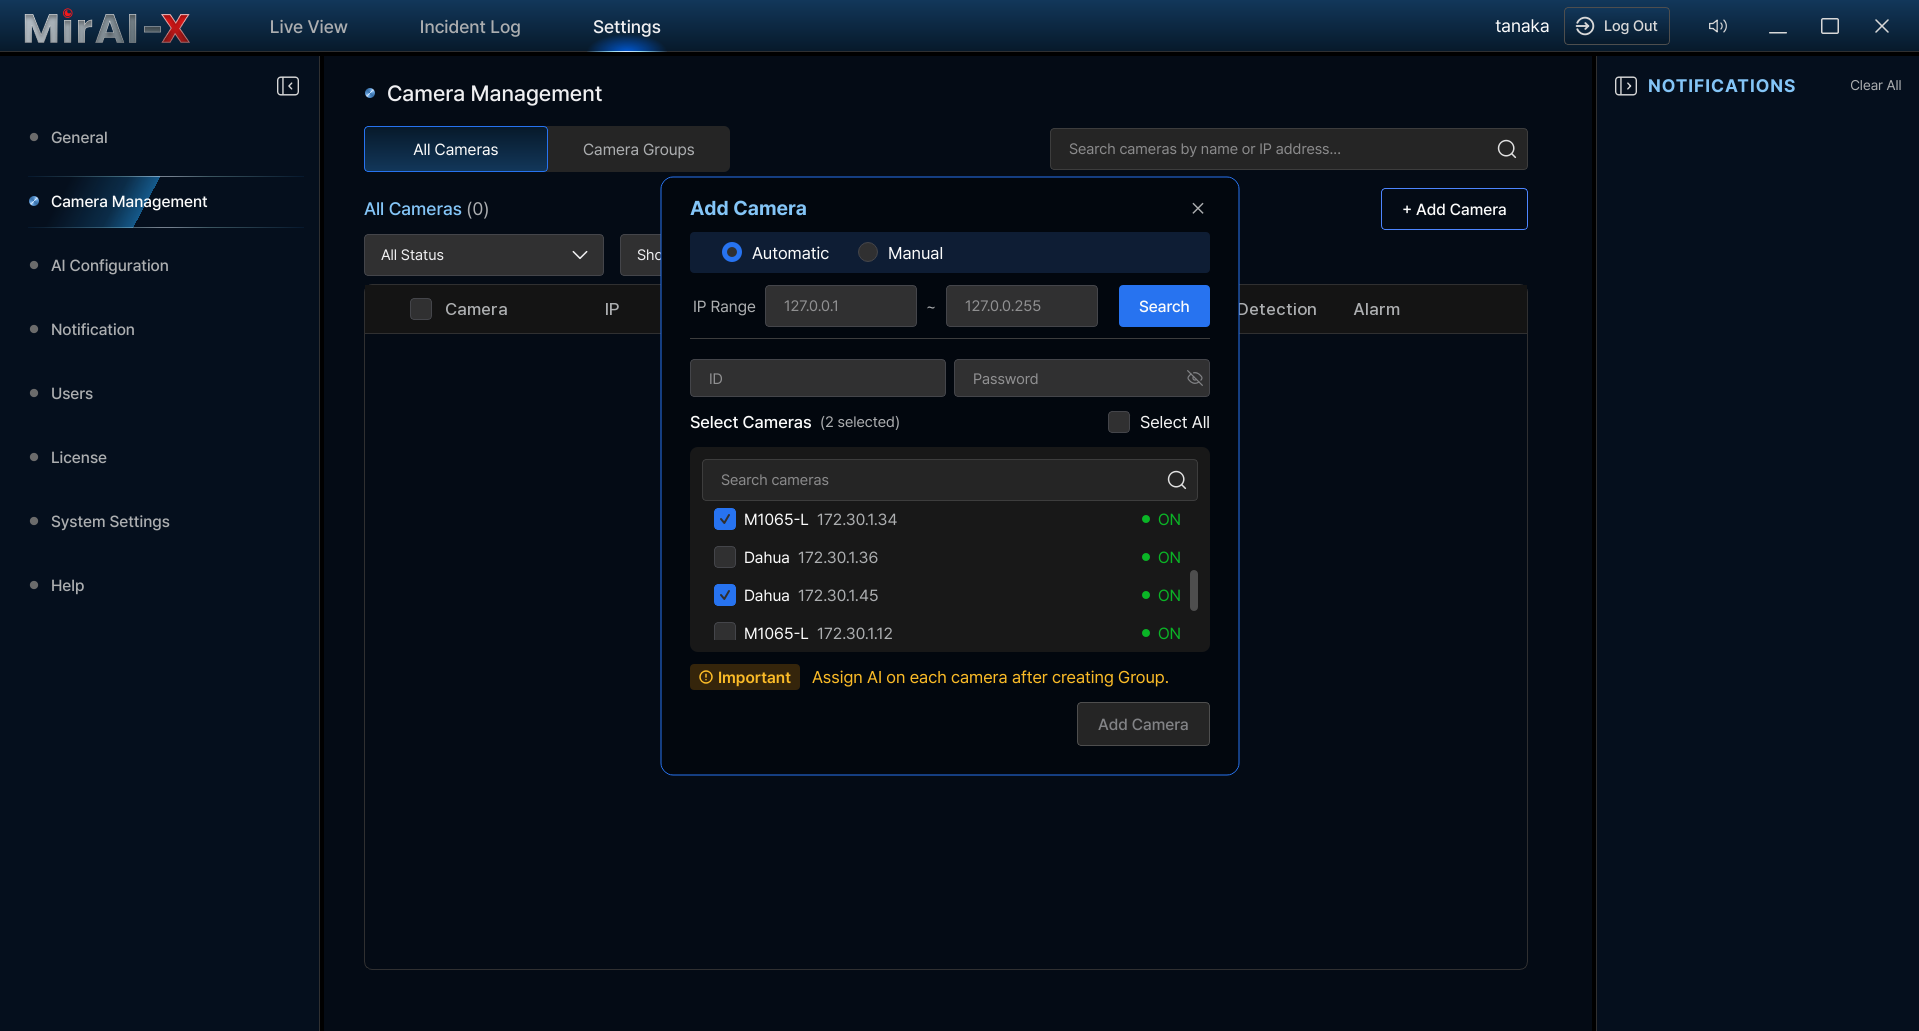
- Go to Settings → Server and Camera → + Add Camera
- Select Automatic mode
- Click Search — cameras discovered on the network appear in a list
- Check the cameras to add
- Enter camera credentials (ID/password) if required
- Click Add
Manual (RTSP URL)
- Select Manual mode
- Enter the camera name and full RTSP URL:
rtsp://user:pass@192.168.1.50:554/stream1 - Enter camera credentials (ID/password) if required
- Click Add
Verify first: Test the RTSP URL in VLC Media Player before adding to confirm it streams correctly.
Embedded credentials: If the entered RTSP URL embeds credentials (rtsp://user:pass@host/...), the ID/PW fields auto-fill and the credentials are stripped from the URL, so they live in one place and stay editable.
Camera Groups & AI Pipelines
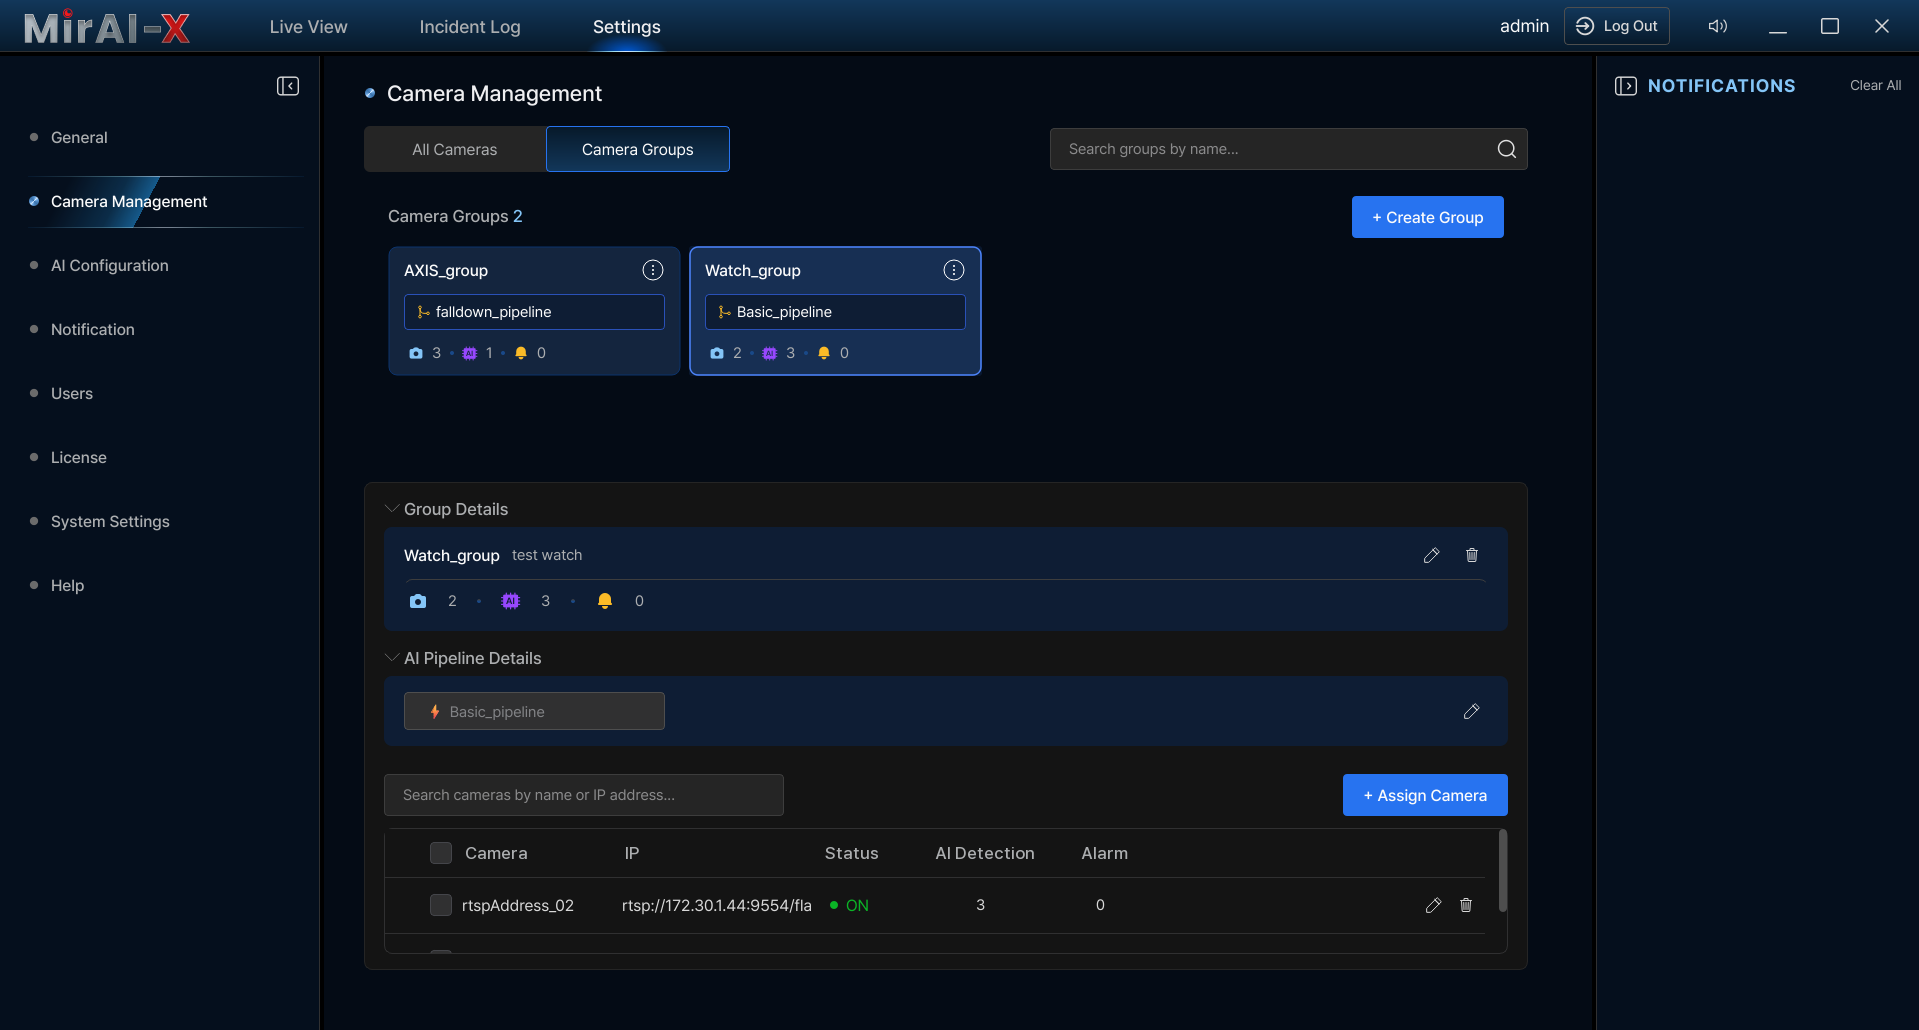
Groups organize cameras and assign shared AI processing. All cameras in a group share the same pipeline configuration.
Moving or removing a camera: Taking a camera out of a group — or moving it to another group — clears that camera's per-camera AI settings and stops its AI engine, so AI processing never keeps running on a camera that no longer belongs to the group.
- Create group: Server and Camera → Camera Groups → + Create Group → enter name → Create
- Assign cameras: Group detail → + Assign Camera → check cameras → Assign
- Assign pipeline: Group Details → Configure AI Pipeline → select pipeline → Add
- Enable per-camera detection: Live View → Select camera → AI Settings → enable Flame/Smoke/Falldown/Intrusion → Save
3. Live View
Grid Controls
Adding cameras to the grid
- Drag a camera from Server List → drop onto empty grid cell
- Drag a server → fills grid with all cameras from that server
- Drag a camera group → fills grid with all cameras in the group
- Rearrange cameras by dragging between cells
If you re-add a camera that is already on the grid, MirAI highlights the existing tile instead of creating a duplicate.
Grid navigation
The grid size adjusts automatically to the number of cameras placed (for example, adding a camera expands a 1×2 layout to 1×3). There is no separate zoom control. While you drag, a live preview highlights the target cell and shows the resulting grid size (for example, "3 × 2").
| Action | How |
|---|---|
| Expand one camera to full view | Double-click the camera |
| Restore grid from full view | Double-click again, or press Escape |
| Show camera ID badges | Right-click grid → "Show Camera IDs" |
| Cancel drag operation | Press Escape |
Camera Hover Menu

Hover over any camera tile to reveal the control bar:
| Button | Function |
|---|---|
| Show Bounding Box | Show/hide AI detection overlay (colored boxes around detected objects) |
| High/Low Resolution | Toggle between High and Low resolution stream |
| Capture | Save a screenshot of the current frame to disk |
| View Fullscreen | Expand this camera to fill the entire grid area |
| Show Info | Show/hide camera info overlay (name, IP, resolution, FPS, codec) |
| Close Camera | Remove this camera from the grid cell |
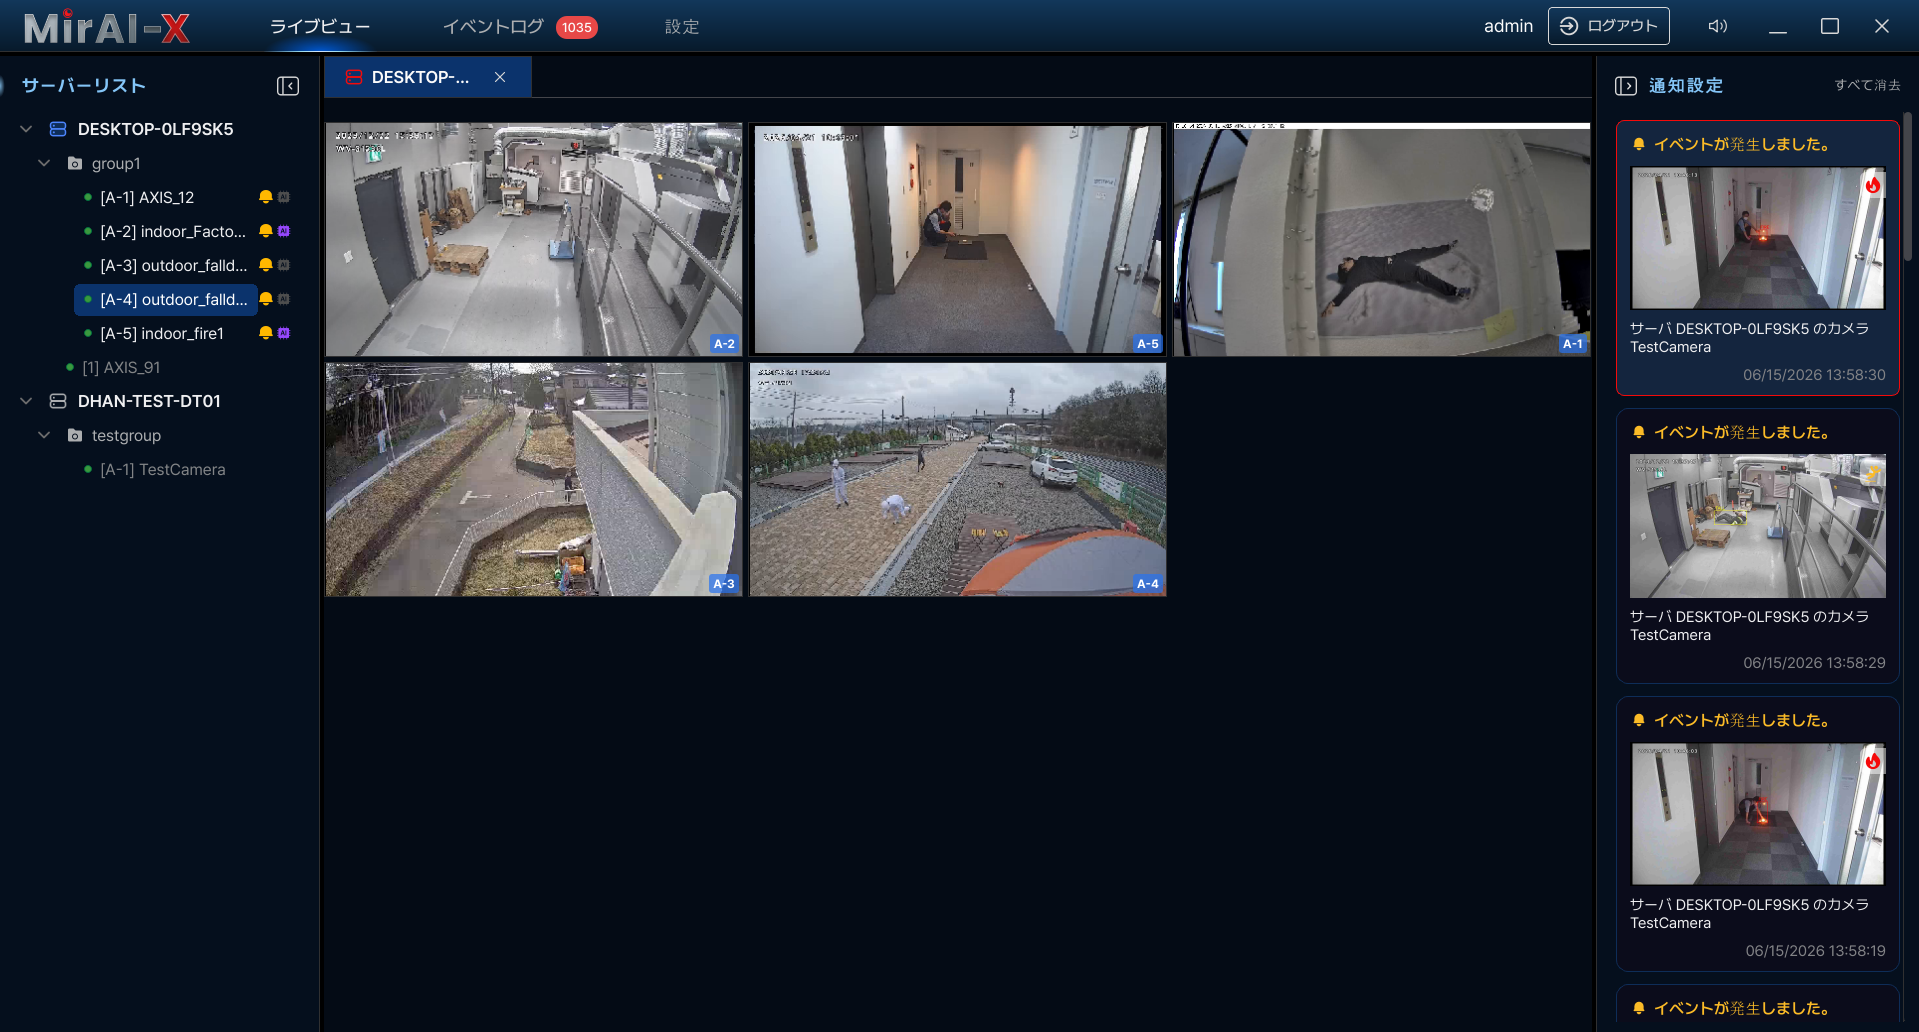
Notifications Panel (Right Sidebar)
When AI detects an event:
- A notification card appears in the right panel showing: event type icon, camera name, server, timestamp, and thumbnail
- Click a notification to jump directly to the incident detail view
- Click "Clear All" to dismiss all notifications
- Use the mute button (top-right, speaker icon) to silence alert sounds
Panel behavior: Hovering over the panel pins your current scroll position while new cards continue to arrive, so the list does not jump under your cursor. The panel keeps up to 50 cards (the oldest are pruned automatically). When the panel is collapsed, the reopen icon pulses red whenever a new alert arrives.
Alert sounds: Each event type plays a distinct sound — Fire and Smoke → Alarm, Intrusion → Siren, Falldown → Alert, others → Beep. Sounds are debounced (about 2 seconds) and can be turned off per notification rule using the rule's "play sound" toggle. Overall volume and muting are controlled in General Settings (Alert Volume / Mute All Alerts).
Rate limiting: To prevent flooding during high-activity periods, the right-panel notifications are limited to 2 per second. This limit applies only to the panel display — all events are still recorded normally in the Incident Log.
Server Management
Server List Tree Structure
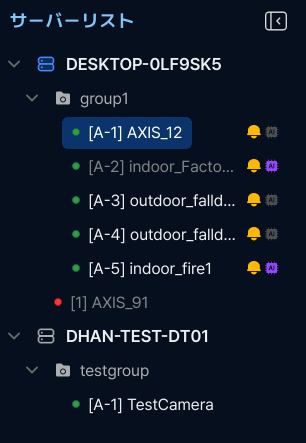
The tree uses presence colors and per-camera status icons:
- Presence color: a camera's name is shown in bright white when it is currently placed on the grid, and grey when it is not.
- AI chip — purple when AI detection is active for that camera.
- Notification bell — yellow when at least one notification rule targets that camera.
- Recording dot — red while recording, yellow when pending, orange on error.
Right-click a camera group to Expand All or Collapse All. You can also drag a camera onto another group to reassign it (a confirmation prompt appears first).
Server Context Menu (right-click a server)
- Server Info — View CPU and GPU product names
- Add Camera — Open the Add Camera dialog
- Test Camera — Open a test video window to verify the stream works
- View Logs — Open Incident Log for this server
Camera Context Menu (right-click a camera)
- Camera Settings — Edit camera name, resolution, profile
- View Logs — View incidents for this camera only
- AI Settings — Configure AI detection for this camera
- View Flow — See the AI pipeline flow diagram (read-only)
Every context menu includes a Show Camera IDs toggle to turn camera ID badges on or off in the grid.
Adding a Server
- Right-click in the Server List area → Add Server
- Enter the server's IP address, User ID, and Password
- Click Test to verify the connection
- Click Add
- The new server appears as a new tab at the top
Server Info Dialog
Right-click server → Server Info shows:
- Server Name — editable only on the server you are logged in to and only with Admin/Super_Admin privilege; otherwise it is read-only and the Save button is hidden.
- CPU and GPU product names
- Remove Server button — disconnect from this server
Working with Multiple Servers
MirAI can monitor several servers from one client. The server you sign in to is your login server; any server you add (above) is an added server and appears as its own tab at the top — switch servers by clicking their tabs.
On an added server you can monitor everything: place its cameras on the grid, watch live video, browse its Server List tree, open its Incident Log, and see its AI events — each camera shows the AI event types defined on its own server.
Added servers are view-only. Camera grouping, AI configuration, notification rules, user management, and most settings can be changed only on the server you are logged in to; to configure an added server, log into it directly. (On an added server the Server Name and similar fields are read-only and group drag-and-drop is disabled.)
To stop monitoring an added server, right-click it → Server Info → Remove Server. This only disconnects your client; it does not change the server itself.
Camera Status Indicators
The following states are shown on each camera tile in the Live View grid:
| Status | Visual | Meaning |
|---|---|---|
| Online | Normal video, green flash on recovery | Streaming normally |
| Stall | Yellow blinking border, frozen frame | Stream interrupted momentarily |
| Reconnecting | Faster yellow blink with a "Reconnecting (n/50)" attempt counter | Server re-establishing connection |
| Offline | Red flashing border, Offline icon overlay | Camera unreachable |
| Connecting | Blinking "Connecting..." text | Initial connection in progress |
| Changing | "Updating settings..." text | Configuration being applied |
| Error | Red flashing border, Error icon overlay, "Connection Failed" text | Unrecoverable stream error |
When an AI event fires on a camera, its grid tile briefly flashes a colored border in that event's color — the same color as the event's detection box (red as a fallback). This Screen Flash on Alerts behavior is on by default and can be toggled in General Settings.
Event icons & colors: Each AI event type has an icon and a color set on its event output in the pipeline, and the client uses this as the single source of truth. The event chips in AI Settings and the event labels in the Incident Log show this icon and color, and the alert flash above uses the same color.
4. Settings & Configuration
Access via the Settings button in the top navigation bar. The left sidebar shows setting categories.
General Settings
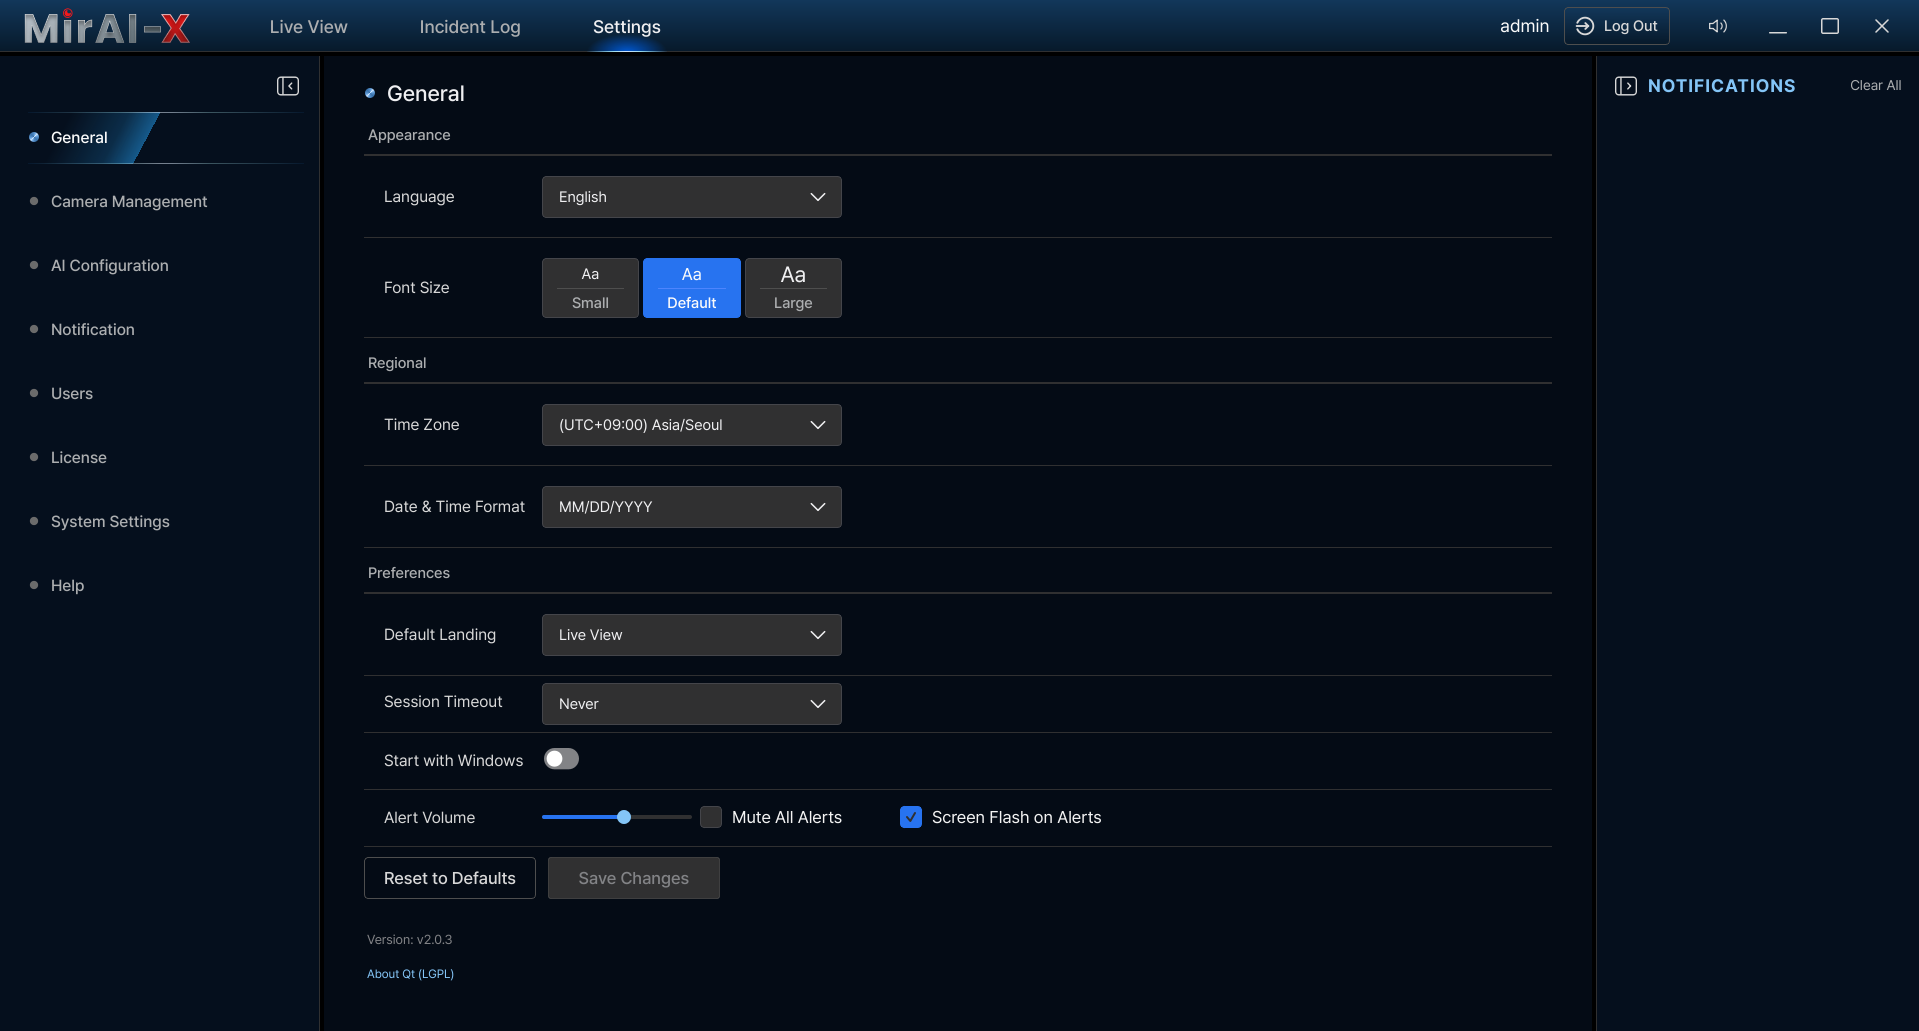
Available to all user roles. Configure appearance and preferences:
| Setting | Options |
|---|---|
| Language | English, Korean, Japanese |
| Font Size | Small, Default, Large |
| Time Zone | Select from system list |
| Date & Time Format | Multiple format options |
| Default Landing | Live View, Incident Log, or Settings |
| Session Timeout | 15 min / 30 min / 1 hour / Never |
| Start with Windows | Auto-launch on system boot |
| Screen Flash on Alerts | On an AI detection, the camera's grid tile flashes a colored border (default ON) |
| Alert Volume | Notification sound volume (0–100 slider) |
| Mute All Alerts | Silence all notification alert sounds |
Server and Camera
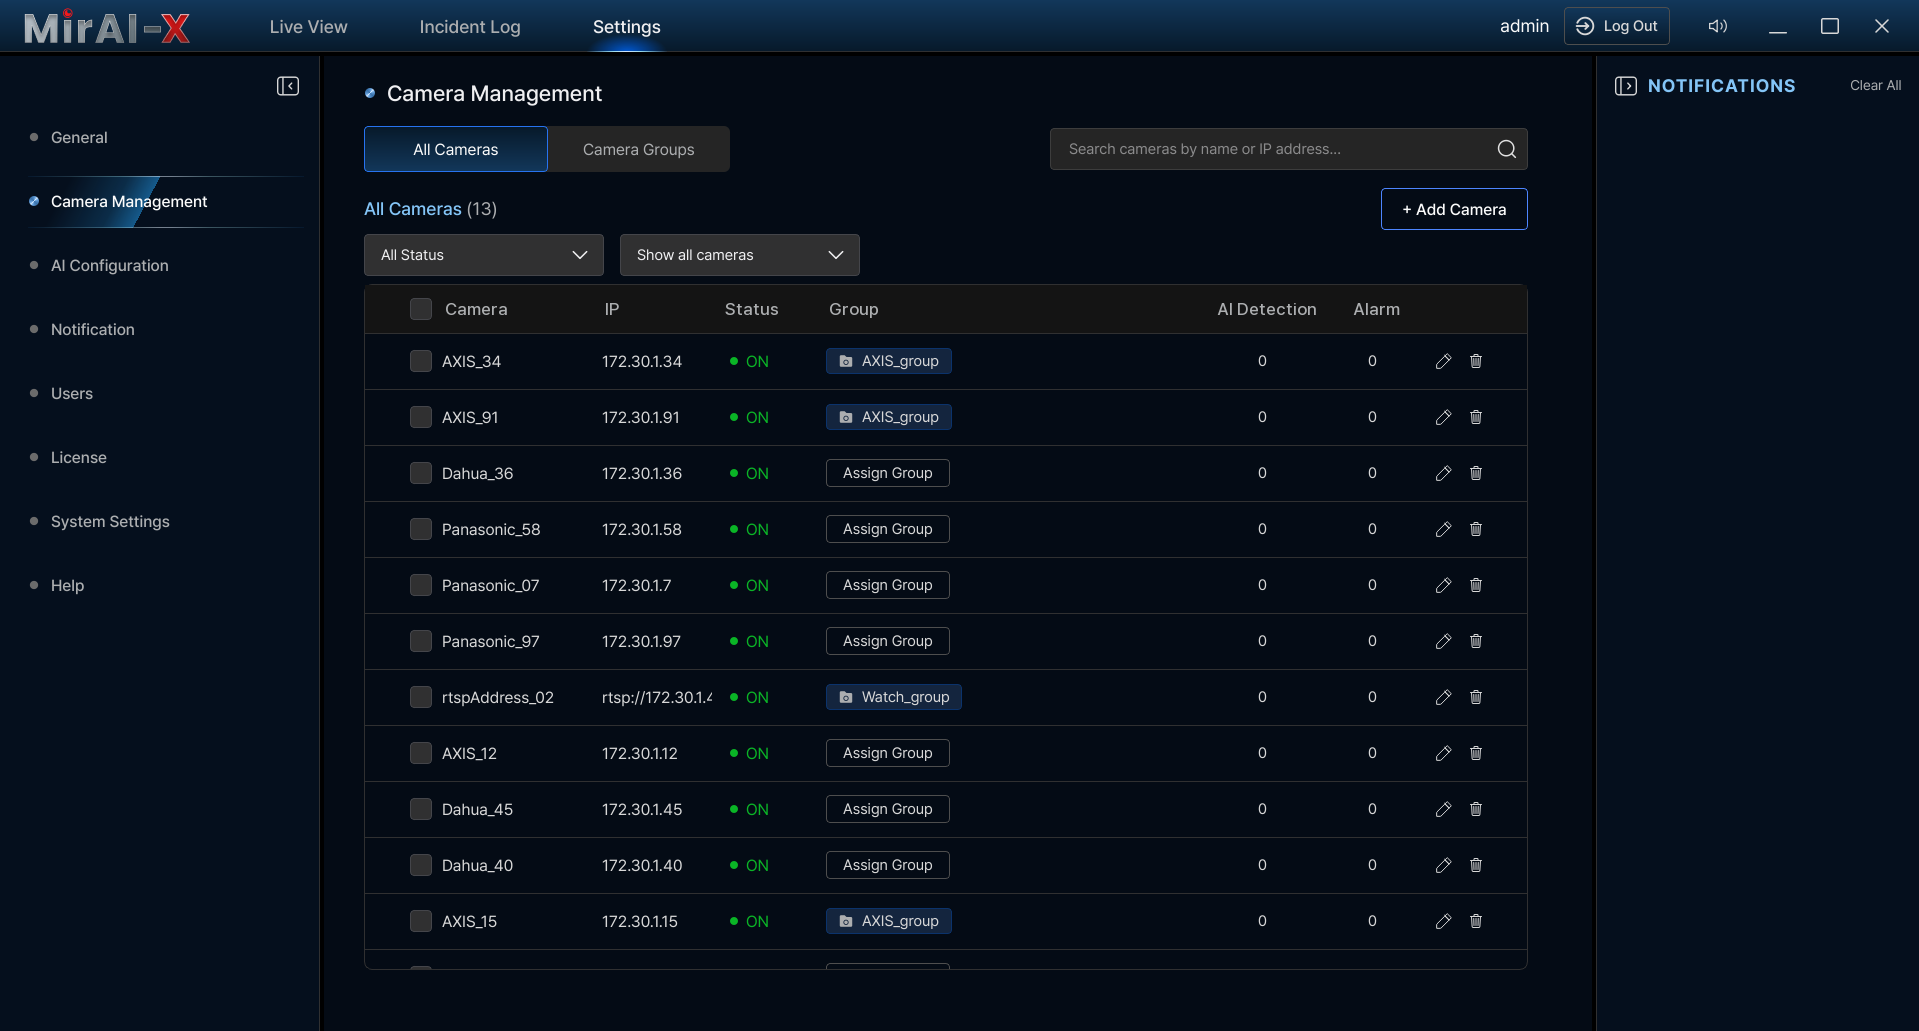
All Cameras Tab
- Table view: camera name, IP, status (online/offline), group, AI detection status, Alarm (AI Detection Status = whether AI detection is enabled for that camera)
- Search: Filter by camera name or IP
- Filters: Status dropdown (Online/Offline/All), Group dropdown
- Batch operations: Check multiple cameras → Assign to Group or Delete
- Edit/Delete: Per-camera action buttons
Camera Groups Tab
- Group cards showing: name, assigned pipeline, camera count, AI count, alarm count
- Create Group: + Create Group → name → Create
- Assign cameras: Group detail → + Assign Camera → check → Assign
- Configure AI Pipeline: Select pipeline from dropdown → Add
Note: A camera belongs to exactly one group, so cameras that are already in a group do not appear in the Assign Camera list.
Note: Per-camera AI detection and alarm channels are configured in Live View → select a camera → AI Settings (see AI Configuration → Per-Camera AI Settings below).
AI Configuration
Access: Settings → AI Configuration. Both Admin and Super_Admin can manage AI models. Only Super_Admin can create/modify pipelines (Admin can view pipelines). For an Admin, the pipeline create, edit, and delete controls appear disabled (greyed out, with tooltips explaining that only Super_Admin can modify pipelines).
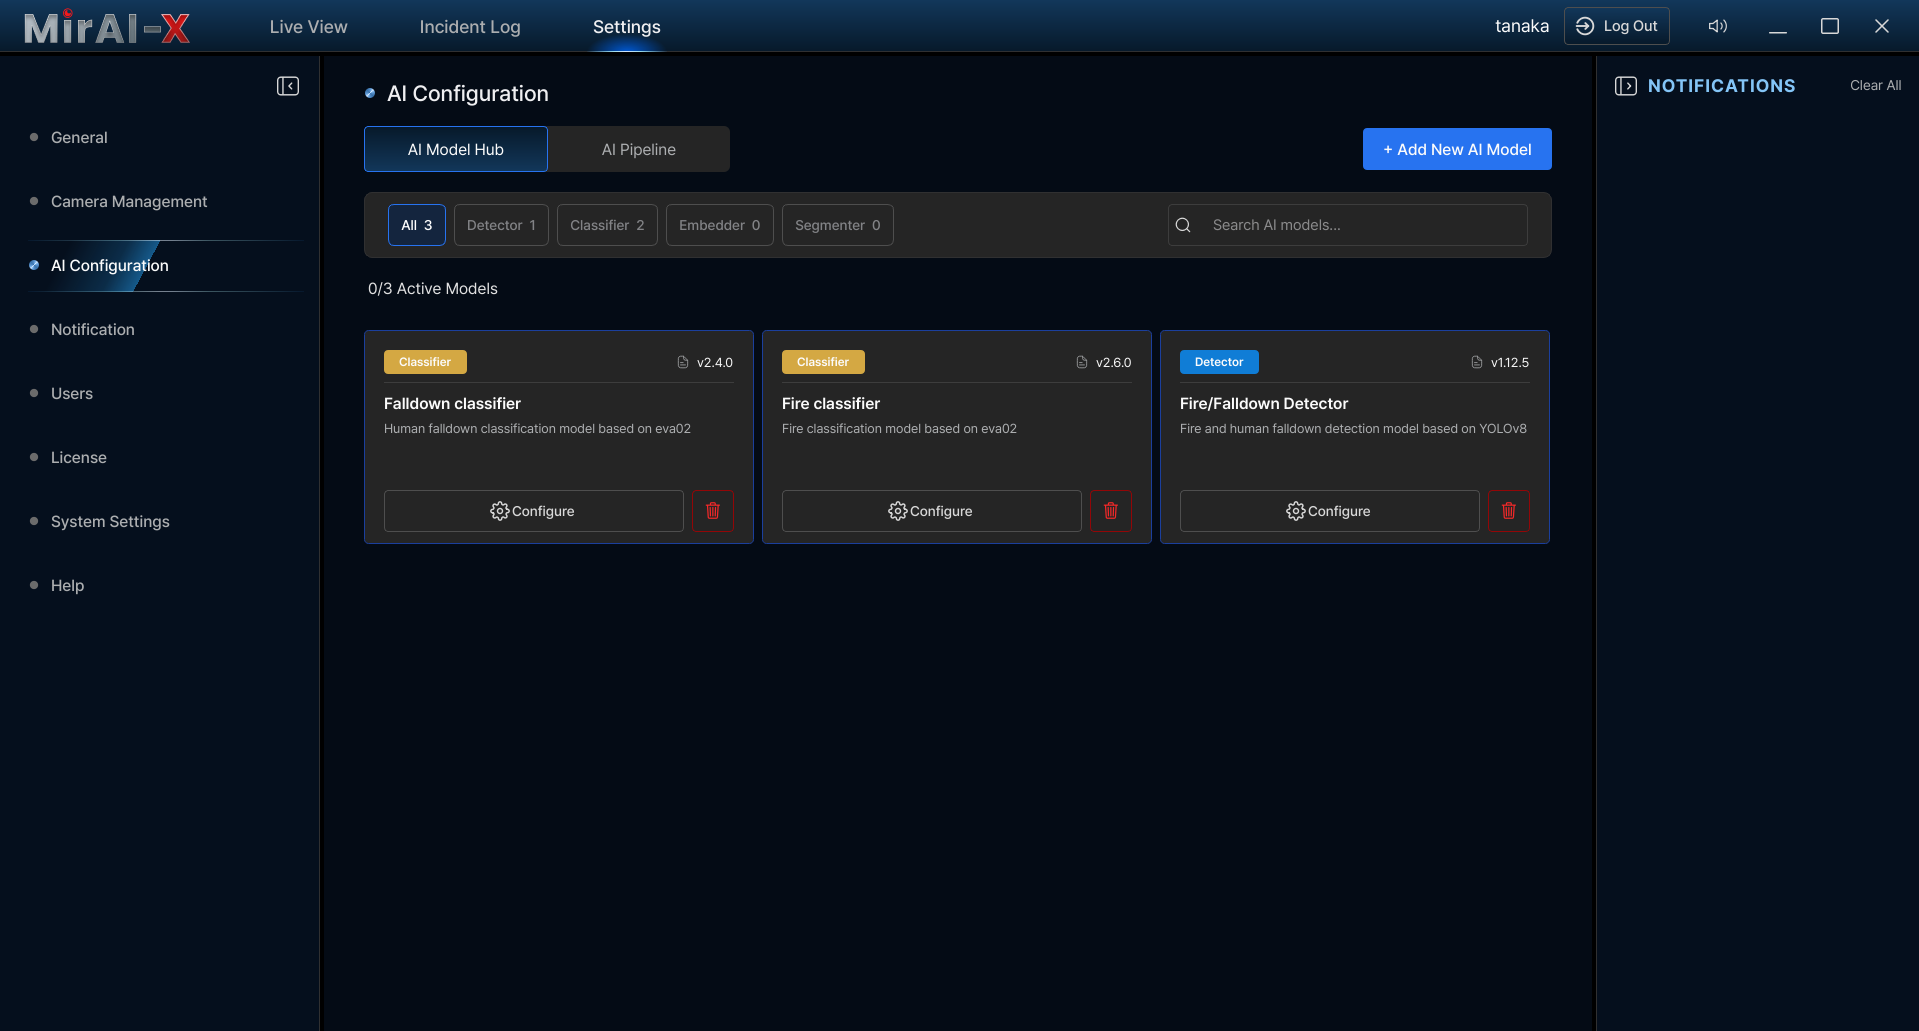
AI Model Hub
- View model cards: type badge (Detector/Classifier/Embedder/Segmenter), version, name, description
- Search & filter: Search models and filter by type (All/Detector/Classifier/Embedder/Segmenter)
- Upload model: + Add New AI Model → upload weights (.onnx/.pt/.enc/.tflite) and manifest (.toml) → Save
- Configure: The model card's [Configure] button opens the version dialog. It provides version history, in-place replacement of the model engine/.toml, uploading a new version, and editing the description (the model name is immutable). Changes apply automatically; a server restart is recommended for structural changes. If you change a model that is used by an active pipeline, a restart-recommended prompt is shown.
- Delete: Only models that are not in use can be deleted. Models referenced by an active pipeline cannot be deleted.
Note: Models have no separate on/off toggle. A model runs when it is used as a node in an active pipeline. Adding or updating a model does not affect AI that is already running.
AI Pipeline Builder
Note: Creating/editing AI pipelines is Super_Admin-only. As an Admin you can view pipelines (right-click a camera → View Flow) and assign existing pipelines to camera groups.
Per-Camera AI Settings
In Live View, right-click a camera → AI Settings:
- Turn the AI function ON → select the event types to detect: Flame, Smoke, Falldown, Intrusion
- Defined Rules: Expand each event output to view and edit its detection rules in a modal (the pipeline's event-output options, including the confidence threshold). A lower threshold is more sensitive; a higher threshold reduces false alarms.
- ROI: Draw polygon — only detect INSIDE this area
- RONI: Draw polygon — IGNORE detections inside this area (ROI/RONI polygons are cleared individually inside the ROI editor)
- FPS to AI: Selector (dropdown) controlling frames sent to AI (lower = less GPU usage)
- Clear: Resets this camera's AI settings to their defaults.
- Click Save to apply changes
Notification
Channels (Delivery Methods)
| Type | Configuration |
|---|---|
| Email (SMTP) | Server, port, encryption, credentials, subject, HTML template |
| Generic Webhook | URL, HTTP method (GET/POST/PUT), headers, payload |
| HTTP Endpoint | Base URL, auth (None/Basic/Bearer/API Key), headers |
| SNMP Trap | IP, version (v1/v2c/v3), community string or v3 security |
Each channel can be tested, toggled active/inactive, edited, or deleted (cannot delete if rules reference it). When multiple headers are needed, separate them with a comma (,).
Note: Webhook and HTTP Endpoint channels can target internal/LAN addresses by default (for example, an on-premises SIEM or a patlite signal tower) — they are not restricted to public URLs.
Rules (IF-THEN Automation)
Create rules in 5 steps. Enter a Rule Name (1-100 characters):
- IF (Trigger): AI Event (Flame/Smoke/Falldown/Intrusion), camera status (Online/Offline), or System Alert
- Scope & Schedule: Select cameras/groups + schedule (Always or Custom days/hours)
- Throttle: Choose the delivery cadence — Immediate (Every Match), Once per minute, Once per hour, Batched (5 min), or Digest (Hourly) — plus an optional Max per day (optional) cap.
- Gates (optional): Additional conditions (e.g., Confidence > 0.5, Box Size)
- THEN (Action): Select channels and email recipients. Each rule can also choose which alert sound plays when it fires, with a preview button to hear it.
Global Policies
- Notification Countdown: Min seconds between same-event alerts from same source
- Limits: Max notifications per minute / per hour
- Quiet Hours: Suppress all notifications during specified time window
Click Save Policies to apply. Click Reset to restore defaults.
Users
Admin/Super_Admin only. Settings → Users.
- Add User: + Add → username (3-20 chars), password (4+), email, role → Save
- Edit: Change role, password, or status (email is not editable). Setting the status to Inactive prevents login without deleting the account.
- Roles: Admin, User (Super_Admin cannot be assigned in the UI)
- Role change limit: a User can be promoted to Admin, but an Admin cannot be downgraded to User.
License Management

License Status
The license page shows: current status (Active / Expiring (N days left) / Expired), expiration date, and licensed camera count.
Note: The license is bound to the machine (hardware/device ID), so a key activated on one server cannot be reused on another.
Online Activation
- Enter key:
XXXXX-XXXXX-XXXXX-XXXXX - Click Activate License
Offline Activation
- Click Generate Request File → save .req file
- Send file to support → receive license file back
- Click Upload License File → Apply License
Expiry: After expiry there is a fixed 7-day grace period during which the system keeps working and shows "Expiring — N days left". Once the grace period ends, AI inference stops, while live view and recording continue. Contact support for a renewal key.
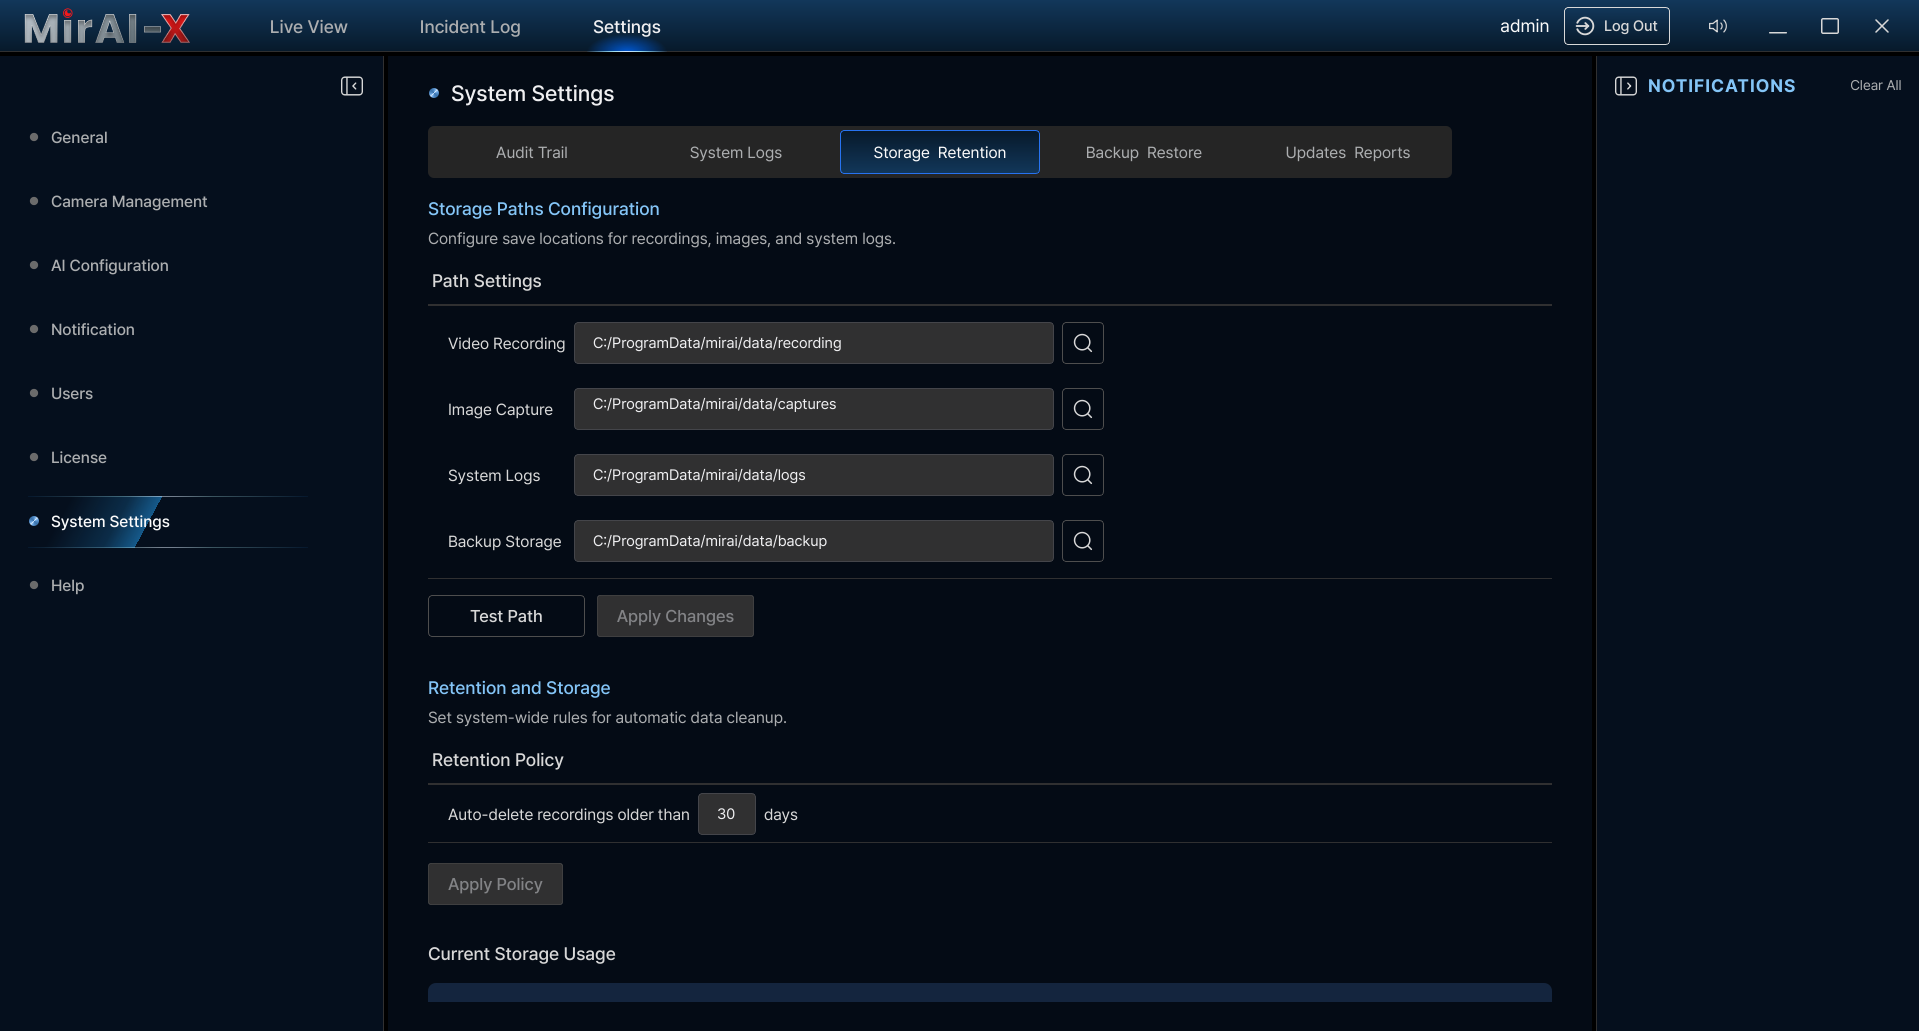
System Settings
| Sub-Tab | Function |
|---|---|
| Audit Trail | Immutable log of all actions. Filter by severity/action/date. Search by user, action, resource, or details. Download as CSV/TXT. |
| System Logs | App/network/camera logs. Configure log levels (OFF/INFO/WARNING/ERROR). Download with date range and format selection. |
| Storage & Retention | Set recording/image/backup paths. Test Path to verify accessibility. Make New Folder. Set retention policy (auto-delete after N days). View storage breakdown by age (last 30 days, 31-90 days, 90+ days). Clean Now button for manual cleanup. |
| Backup & Restore | Manual or scheduled backup with selective categories. Trigger Manual Backup → choose categories to include (each category is individually selectable, with Select All / Deselect All):
Backup Preview: Before triggering a backup, a preview dialog shows exactly which categories will be included, estimated file counts, and total size. Review and confirm before proceeding. |
| Updates & Reports | Current version and release date. Check for Updates / Download Update (shows progress bar and release notes in popup). Offline Update (upload .zip for air-gapped environments). Download Daily Report. There is no standalone System Restart or System Stop button; instead, a restart is prompted contextually after an update is applied or after a model/pipeline change. |
Restore warning: Restoring overwrites current configuration for the selected categories. Always create a fresh backup before restoring.
Help Page
Settings → Help (available to all roles). Contains:
- User Manual — Opens this manual in your default browser
- Contact Support — MarkAny Co., Ltd. support information (website, phone, email)
- Keyboard Shortcuts — Quick reference for all keyboard shortcuts
- Third-Party Licenses — Qt (LGPL v3), GStreamer (LGPL v2.1+), OpenCV (Apache 2.0), Rust crates (MIT/Apache 2.0)
System Maintenance
Clear cached data to free disk space (Settings → System Settings → Updates & Reports → Maintenance):
- Application Cache, Temporary Files, Thumbnail Cache
- System Logs, Video Recordings, Image Captures, Backup Storage
- Clear All Cache & Logs: One-click cleanup (confirmation required, system may be slower temporarily while rebuilding cache)
5. Incident Log
Access via the Incident Log tab in the top navigation, or right-click a server/camera → View Logs.
Filtering Incidents
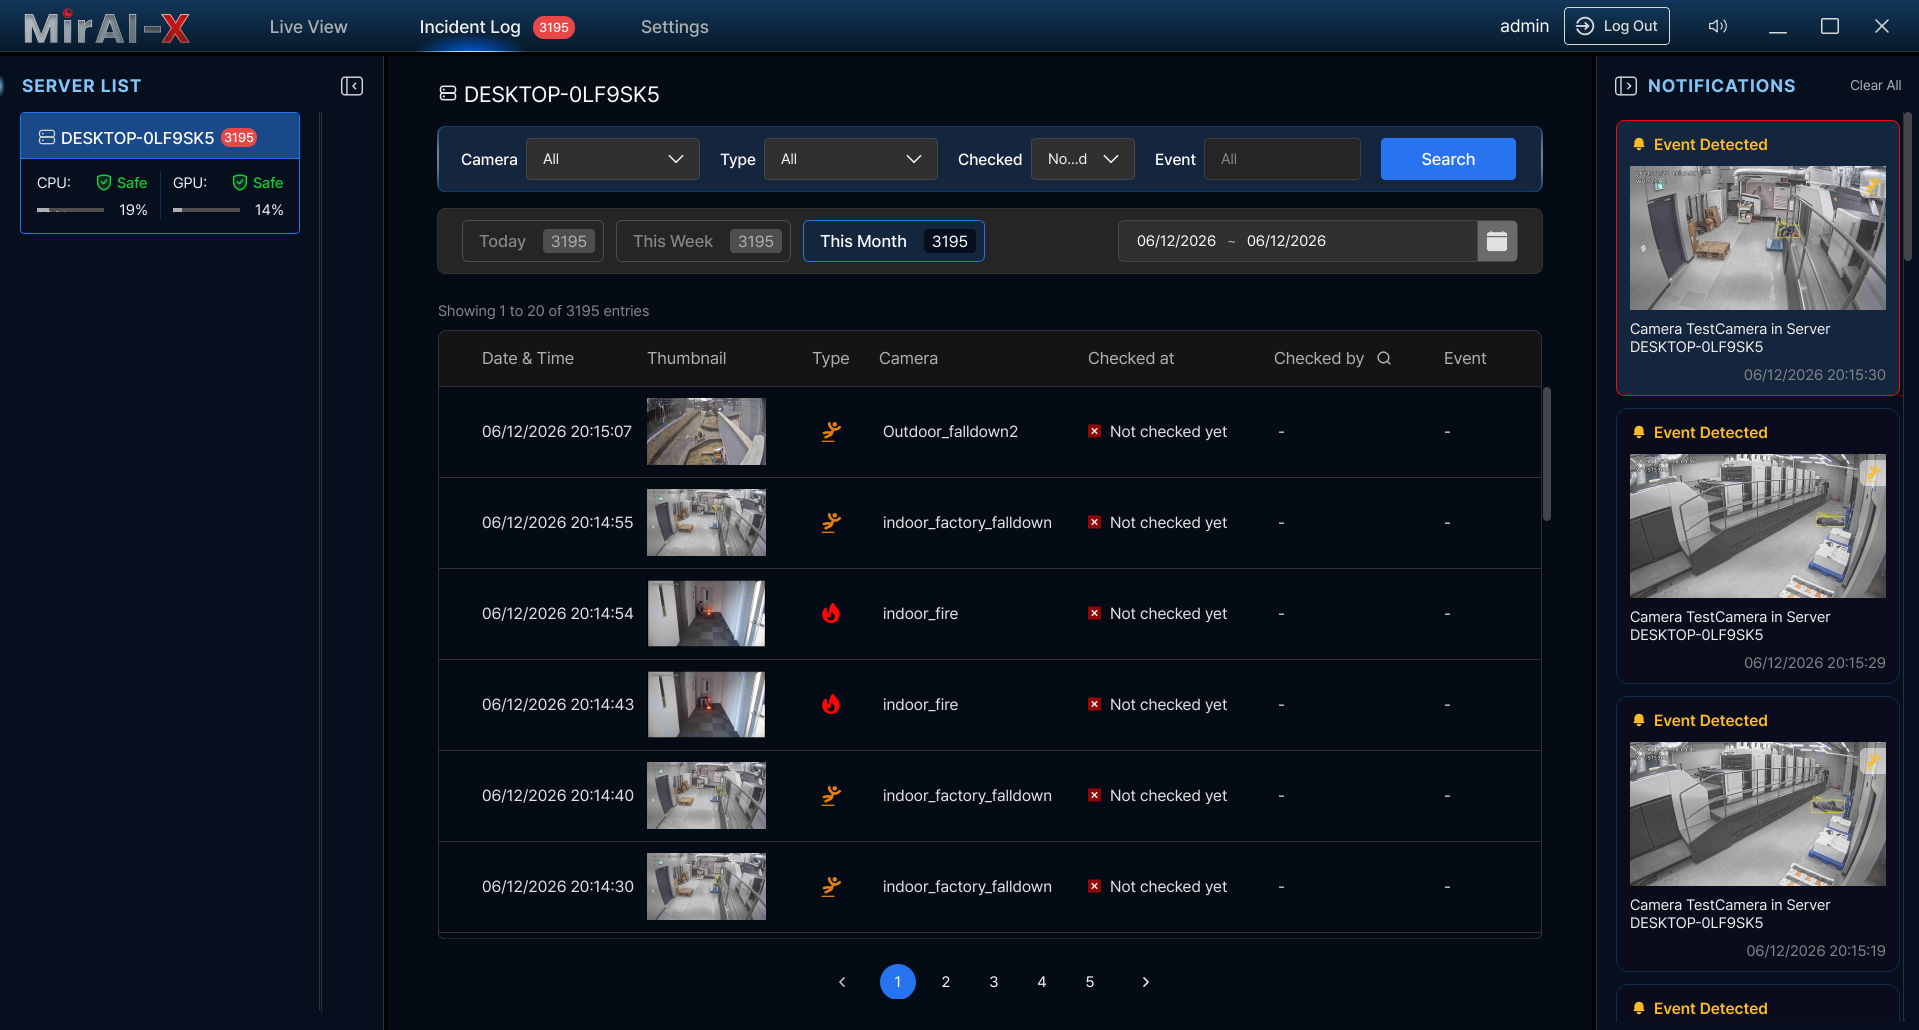
| Filter | Options |
|---|---|
| Date Range | Today, This Week, This Month, or Custom (calendar picker) |
| Camera | Specific camera or All |
| Event Type | Flame, Smoke, Falldown, Intrusion, or All (the list is populated dynamically from the configured event types) |
| Audit Status | Checked, Not Checked, All |
The table shows: Date & Time, Thumbnail, Camera, Type, Event (True/False), Checked by, Checked at. Pagination at the bottom.
Incident Detail View
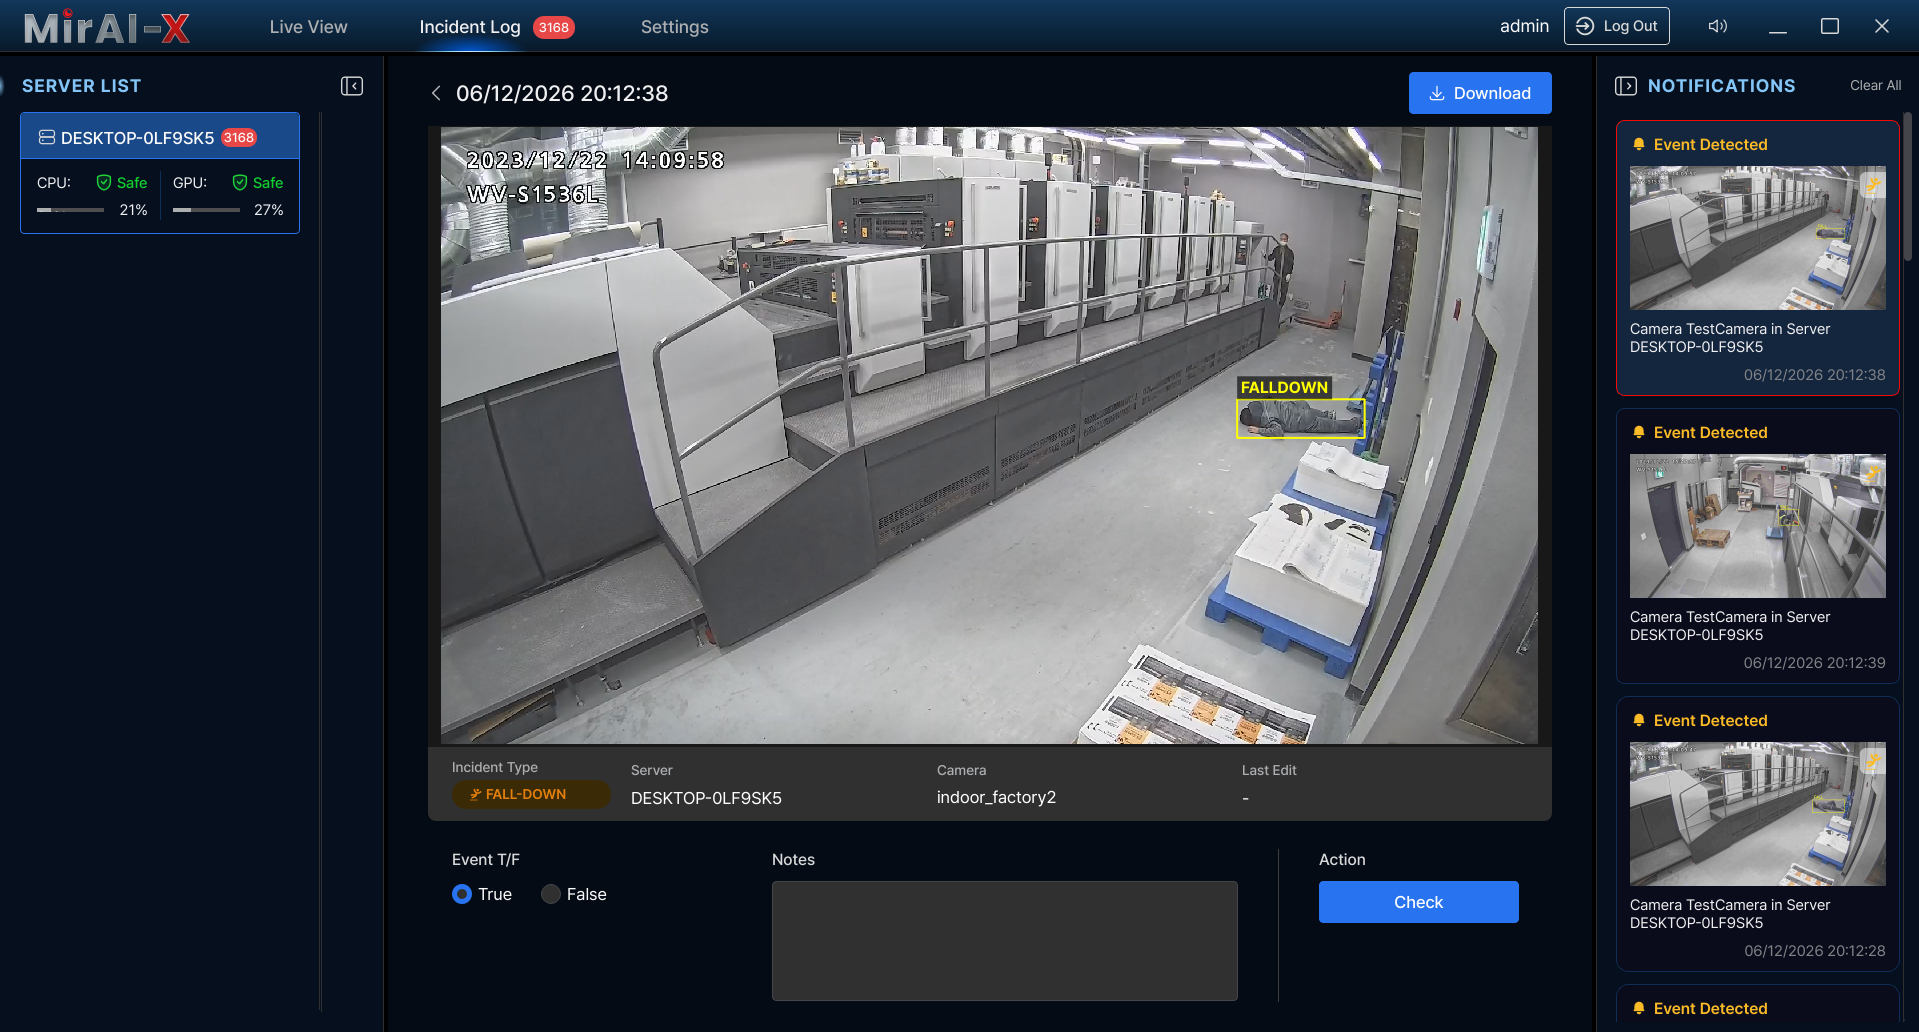
Click any row to open:
- Video playback with timeline scrubber — includes about 5 seconds of pre-event buffer. Click Play, drag to seek.
- AI bounding box overlay on the captured image showing what was detected
- Metadata: Incident Type, Server, Camera Name, Last Edit, Event T/F
Auditing Incidents
- Select True or False — True = real event confirmed, False = false positive
- Add notes (optional) — describe what you observed (up to 500 characters)
- Click "Check" — the incident now records: Checked by, Last Edit, True/False status
Tip: After auditing, click Edit if you need to change your assessment later.
Image library: Auditing an incident saves its cropped detection-box image(s) to an image library, sorted by your verdict into two sets: confirmed incidents go to a True set and false detections go to a False set (each organized by camera and event type). The False set is the important one: the AI uses it as a reference to recognize and suppress similar false detections in the future, which is the library's main purpose. The images always reflect the latest verdict — switching between True and False moves them to the matching set, and clearing the verdict removes them. Near-duplicate images (the same recurring scene captured many times) are removed automatically so each distinct pattern is kept just once, keeping the library compact through de-duplication rather than by deleting older images. A daily task keeps the library in sync with the current verdicts.
Downloading Incidents
- Click the Download icon on the detail page
- Select format: Image (PNG/JPG) and/or Video (MP4/AVI)
- Optionally enable the Include Bounding Box checkbox to burn the AI detection boxes into the exported image or video
- Choose a save folder → download begins with progress indicator
Additional Export Options
- Generate Incident Report: Settings → System Settings → Updates & Reports → Generate Incident Report → choose date range, style, graph grouping → Generate
- Daily Report: Settings → System Settings → Updates & Reports → Download Daily Report
6. Frequently Asked Questions
Q: How many cameras can MirAI handle?
Server: up to 100 streams (hardware dependent). Client grid: up to 100 simultaneous feeds. Performance depends on resolution, frame rate, and GPU capability.
Q: Can I access the system remotely?
Yes. Use port forwarding (server ports 7878/7575) or VPN. VPN is strongly recommended for production. TLS (HTTPS/WSS) is enabled by default.
Q: What cameras are supported?
Any camera with RTSP: Hikvision, Dahua, Axis, Hanwha, Bosch, etc. ONVIF cameras are auto-discoverable.
Q: What AI events can be detected?
Flame (fire), Smoke, Falldown (person falling), and Intrusion (unauthorized entry). Each configurable per camera with ROI/RONI zones.
Q: How do I connect to multiple servers?
Right-click Server List → Add Server → enter IP and credentials. Each server appears as a separate tab.
Q: Why does the first boot take 15-30 minutes?
The server builds TensorRT engine files optimized for your GPU. This happens once. Subsequent starts take under 30 seconds.
Q: Can I get notifications on my phone?
Yes. Set up a Webhook channel pointing to Slack, Teams, LINE, or any HTTP service. Email via SMTP is also supported.
Q: How do I back up my configuration?
Settings → System Settings → Backup & Restore. Manual or scheduled (daily/weekly/monthly). Includes all settings, cameras, users, and rules.
Q: What is ROI vs RONI?
ROI = Region of Interest (detect ONLY inside). RONI = Region of Non-Interest (EXCLUDE from detection). Use RONI for areas causing false alarms.
Q: How do I update the application?
Settings → System Settings → Updates & Reports → Check for Updates. For offline environments, use the Upload .zip option. Always update server before clients.
Q: What network ports need to be open?
7878 — REST API (HTTPS, client ↔ server). 7575 — WebSocket (WSS, real-time sync). 8554 — RTSP video streaming. 7979 — TCP file transfer. Ensure your firewall allows inbound traffic on these ports for the server machine.
Q: How do I change my password?
Go to Settings → Users → click the Edit button on your account → enter your new password → click Save. Admins can also change passwords for other users.
Q: How do I migrate to a new server?
1) Create a full backup on the old server (Settings → System Settings → Backup & Restore → Manual Backup with all categories). 2) Install MirAI on the new server. 3) Log in to the new server. 4) Go to Backup & Restore → Restore → upload or select the backup file. 5) Verify that cameras reconnect and AI pipelines are active.
7. Troubleshooting
Connection Issues
Disconnect & Reconnect Behavior
When the server connection is lost:
- A "Disconnected" overlay appears on the main screen
- Camera streams freeze on the last received frame
- The client automatically attempts to reconnect every few seconds
- Once reconnected, streams resume and the overlay disappears
- Notifications received during disconnection are not retroactively shown
Common Connection Problems
- Verify the server application is running on the target machine
- Confirm IP address and port (default:
7878) - Check firewall allows inbound connections on the server port
- Ensure both machines are on the same network or VPN is configured
- "Server disconnected" during use → check network. Client will auto-reconnect.
Camera Issues
Feed not displaying
- Test RTSP URL in VLC first to confirm it works outside MirAI
- Ensure camera is reachable from the server machine (not just client)
- Check camera status indicator (green=online, red=offline, yellow blink=stall)
- Review server logs:
logs/server.log
No cameras found during discovery
- Verify IP range is correct and cameras are powered on
- Check that cameras support ONVIF and have it enabled
- Try adding manually via RTSP URL instead
AI Detection Issues
- Confirm detection is enabled for the camera (right-click → AI Settings)
- Confirm camera is in a group with an active pipeline assigned
- Lower confidence thresholds (try 0.3-0.5 for testing)
- Check ROI/RONI — event may be outside your ROI polygon
- Verify server GPU is not overloaded (>90% → dropped frames)
- Check that the correct AI model is Active in Model Hub
- Review
logs/ai_pipeline.log
Notification Issues
- Verify channel is active (toggle ON in Channels tab)
- Click Test button on channel card to confirm delivery
- Check that a rule links the event type to the channel
- Check Global Policies — Quiet Hours may be suppressing
- Check rate limits (max per minute/hour may be exhausted)
- Email: verify SMTP settings, port, encryption, credentials
- Webhook: verify URL is reachable from server
Common Error Messages
| Message | Cause | Solution |
|---|---|---|
| "Please check the ID and Password" | Wrong credentials | Verify with admin |
| "IP Invalid" | Malformed IP | Use format: 192.168.1.100 |
| "Session expired" | Inactivity timeout | Log in again; increase timeout in General Settings |
| "AI Engine Loading" | First boot model build | Wait 15-30 min, do not restart |
| "No camera found" | ONVIF discovery failed | Check IP range, camera power, ONVIF enabled |
| "Server disconnected" | Network interruption | Check network; client auto-reconnects |
| "License expired" | License needs renewal | Contact support for new key |
| "Invalid license" | Key format error | Use XXXXX-XXXXX-XXXXX-XXXXX, no special chars |
Performance Tips
- Use smaller grid layouts to reduce CPU on the client
- Switch cameras to Low Resolution in the hover menu when monitoring many feeds
- Lower the "FPS to AI" selector to reduce server GPU usage
- Set retention policy to auto-delete old recordings and free disk space
- Close other resource-intensive applications on the client machine
When contacting support: Include your app version (Settings → System Settings → Updates), OS info, steps to reproduce, and log files from the logs/ directory.
Quick Reference: Tips & Shortcuts
| Action | How |
|---|---|
| Expand camera to full view | Double-click the camera in the grid |
| Return to grid | Double-click again or press Escape |
| Quick camera access | Right-click camera in server tree |
| Fill grid with all server cameras | Drag the server name onto the grid |
| Show/hide camera IDs | Right-click on grid → "Show Camera IDs" |
| Test camera before adding | Right-click camera → Test Camera |
| Quick filter incidents | Use Today / This Week / This Month buttons |
| Check server health | Right-click server → Server Info |
| Submit login | Press Enter on login screen |
| Exit fullscreen | Press Escape or click fullscreen button again |
| Cancel drag operation | Press Escape during drag |
8. Glossary
- ROI (Region of Interest)
- A user-defined polygon on the camera view. AI detection only triggers for events occurring inside this area.
- RONI (Region of Non-Interest)
- A user-defined polygon that excludes an area from AI detection. Events inside RONI are ignored to reduce false alarms.
- RTSP (Real-Time Streaming Protocol)
- A network protocol used to control and deliver real-time video streams from IP cameras to the MirAI server.
- ONVIF (Open Network Video Interface Forum)
- An industry standard for IP camera interoperability. Enables automatic camera discovery and configuration without vendor-specific setup.
- TensorRT
- NVIDIA's high-performance deep learning inference optimizer and runtime. MirAI uses TensorRT to accelerate AI model execution on NVIDIA GPUs.
- NSSM (Non-Sucking Service Manager)
- A Windows service manager used to run the MirAI server as a background Windows service that starts automatically on boot.
- Pipeline
- A configured chain of AI processing stages (Detector → Classifier → Tracker) that processes video frames and produces detection events.
- Bounding Box
- A rectangular overlay drawn on the video frame indicating where the AI model detected an object or event.
- Confidence Threshold
- A numeric value (0.0–1.0) that determines the minimum certainty required for an AI detection to be reported. Lower values increase sensitivity; higher values reduce false positives.
- JWT (JSON Web Token)
- A secure token format used for authentication between the MirAI client and server. Issued at login and included in all subsequent API requests.
- SMTP (Simple Mail Transfer Protocol)
- The standard protocol for sending email. Used by MirAI's notification system to deliver alert emails through a configured mail server.
- SNMP (Simple Network Management Protocol)
- A protocol for network device monitoring. MirAI can send SNMP traps to integrate with enterprise network management systems (NMS).
- Webhook
- An HTTP callback that sends real-time event data to an external URL when an AI detection occurs. Used to integrate with Slack, Teams, LINE, or custom services.